This is a comprehensive route description with photos of the route for those interested in climbing Granite Peak. This is the same route description which I wrote for www.SummitPost.org and www.Rockclimbing.com, and describes the standard route that is used to climb Granite Peak.
USE THIS AT YOUR OWN RISK! THERE ARE NO GUARANTEES THAT THE ROUTE DESCRIPTION OR PHOTOS ARE ACCURATE OR CORRECT.
The rating of South Face route of Granite Peak is subjective at best. We rated it as "Class 4+", the "plus" meaning that you may encounter what could be deemed a low class 5 move. Very careful route finding may avoid class 5, but even the easiest route is very exposed at times. This is the rating that was given based upon personal experience and the consensus of guidebooks, internet summit logs, and other climbers we met. Many different climbers and guidebooks have rated this climb from class 3, up to and including 5.7. We concluded that the route is solid class 4 with possibly the occasional low class 5 move. For those who are unfamiliar with "Class 4+" or "Class 5": Class 4 is considered requiring rock scrambling skills with extreme exposure. Class 5 is considered requiring technical rock climbing skills with the addition of needing ropes, protection, and other technical climbing equipment.
It all boils down to how comfortable the individual is with exposure. Know your abilities and your performance level under exposed conditions. Back off if you do not feel comfortable. Best to come away safe than to get into terrain exceeding your abilities. Granite Peak is not a walk-up mountain. It is considered one of the most difficult high-points due to the length of the approach, the exposed climbing near the summit, and the notorious Beartooth weather. It is recommended that one get experience on less challenging peaks before tackling Granite. Otherwise, it is a great mountain! Good luck in your endeavor!
APPROACH AND ROUTE DESCRIPTION (Text)
Trailheads and Approaches: There are three primary trailheads and approaches to Granite Peak, West Rosebud (Avalanche Lake), West Rosebud (Froze-To-Death plateau), and the East Rosebud Trailhead (Froze-to-Death plateau). Each trailhead and approach has it's advantages: FTD Plateau is easier terrain, but is very exposed to storms. The Avalanche Lake approach is better protected from storms, but the terrain is extremely rough, forcing the climber to cross a treacherous boulder field (moraine) prior to reaching the saddle. You will have to make your own decision based upon your ability and the weather forecast. However, the general consensus is that the West Rosebud/FTD Plateau approach and route offers the best chance of success. The East Rosebud Trailhead is another option which will also put you on the FTD Plateau. For info on this approach, click on the SummitPost.org link.
The West Rosebud Trailhead is located approximately 80 miles southwest of Billings. To reach the trailhead, take the Columbus exit from Interstate 90, and take Montana Highway 78 through Absaroka and turn west (right) toward Fishtail (approximately 17 miles from Columbus). From Fishtail, drive west and south for 1 mile, turn south (left) on West Rosebud Road. Follow this paved road for 6.3 miles until reaching a fork in the road and a large brown Forest Service sign. The sign will indicate West Rosebud Lake Road #72. Turn left here and follow the dirt road for 14 miles until reaching the trailhead. The trailhead has toilet facilities, and a parking area where climbers can leave their cars. Just before reaching the trailhead is a Forest Service campground with fresh water available.
The trail actually begins up the road about 200 yards, and is reached by walking through the Montana Power Company facilities where the trailhead is clearly marked with a Forest Service sign. From there, the trail leads toward Mystic Lake (7637 ft.), one of the most popular day hikes on the Custer National Forest. The trail is relatively flat for about the first two miles, leading to switchbacks that eventually bring the hiker to a point looking over Mystic Lake Dam. The total elevation gain is about 1,200 feet over 3 miles. Once at the dam overlook, descend down to Mystic Lake and continue hiking for a half mile (0.5 miles) until reaching an intersection for the Phantom Creek Trail #17 branching to the left (south). The trail intersection sign is now gone, but the intersection is near a meadow and marked with a cairn. Follow this trail up through the switchbacks until reaching a huge cairn above treeline. Just past the cairn, leave the trail to the south and head uphill to the plateau. At this point, take note of the weather. If it appears that severe storms are looming, suggest waiting until they pass before your push across the plateau. (This section courtesy of the U.S. Forest Service)
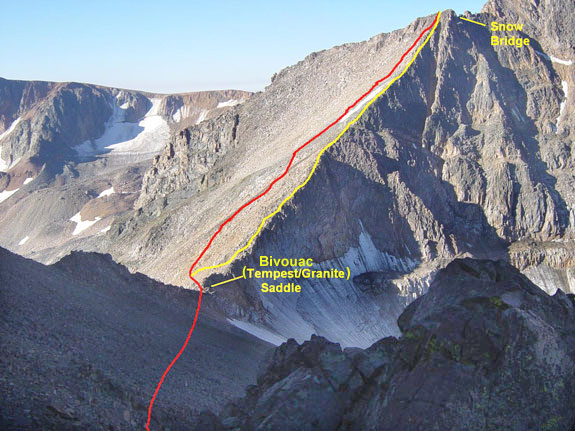
Once on the plateau you will see cairns in the distance heading southwest. The USGS map, Granite Peak, is recommended for the hike across FTD plateau. There is no trail, so generally follow the huge cairns across the plateau, always keeping Froze-To-Death mountain on your left (south). Once you pass Froze-To-Death mountain, you will begin to see Granite Peak peaking over the edge of the plateau. Avoid the urge to head directly to Granite Peak. Instead, bear left toward the base Tempest Mountain where you will find camping areas. There are many places to camp along FTD plateau; however, if using a high camp on Froze-To-Death Plateau, the further you can get to Tempest Mountain the better. You can cut significant time off your summit day by camping at the base of Tempest. At the base of Tempest Mountain, you will find a trail leading down the scree slope to Bivouac Saddle. For those who chose the much rougher Avalanche Lake approach, get a pre-dawn start for your climb to the saddle. It's a 2000' climb from Avalanche Lake to Bivouac Saddle (saddle between Tempest Mountain and Granite Peak) through very rough terrain.
Final Route Description: The first obstacle is to climb the east slope/ridge immediately above Bivouac Saddle. From the saddle, traverse left (south) for a short distance and follow a faint climber's trail to the left of the east ridge. After going left, the trail will turn up the slope near a rib. From here, either continue up the slope via a faint climber's trail or continue right (north) to the east ridge (class 3). Either way, climb the slope or the ridge and finish via class 3 moves on the right (north) side of the top.
At the top of the east ridge, you will be able to see the snow bridge. Take time to view the chimney system across the gully and consider your route. Locate the "X" crack feature which will help in route finding once in the system. From the top of the ridge you just climbed, descend slighly, then traverse right, staying high on the slope while moving towards the snow bridge. In late season, the snow will be gone and it will be a small saddle instead of a snow bridge. In early season, a belay and/or ice axe may be needed to cross the snow bridge.
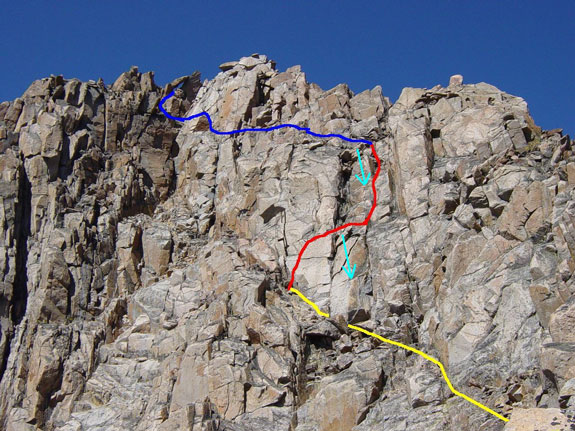
After the snow bridge, descend slightly to the left and ascend the left-most chimney via class 4 moves. After the chimney, go left of the "X" crack feature (see photo), and continue up another chimney to the far left. Exit right onto a ledge, and ascend the final class 4 chimney to the top of a rib. From the top of the rib, drop down into a shallow gully. Cross the gully and do a class 4 scramble up an obvious chimney to a notch, where a rap station will be seen.
From the notch, the entire south face and final route will be in view. Take time to consider your route and note features. Once on the face, occasional cairns will help guide the way. From the notch, begin by traversing north, then west (left), staying high, towards the face. Scramble up to a slab with a large horizontal crack. Use class 4+ moves to ascend a crack, then traverse right onto a small ledge under two chimneys. A rap station will be found here. Move up directly between the chimneys on exposed class 4 terrain. Stay between the chimneys to avoid class 5. (See photo below) Above the chimneys, another rap station will be found.
Continue up another 30 ft until reaching a large flat boulder area. From here, traverse the face (class 3) to the left (west) until reaching a ledge below the keyhole. Directly under the keyhole, go up and right through a chute via class 4 moves until reaching a ledge. Another ledge with a low roof will be seen above with human-built stepping stones placed to climb up to the ledge. Once on this ledge, move left for a few feet, then exit to the right (north). Continue to the right for the final summit scramble (class 3). For the descent, down climb and reverse your route to the 2nd rap station above the chimney system. Either down climb or make two 80 ft rappels to the base of the face.
A convenient rap station is also at the notch, and yet another is above the snow bridge section. When descending the long slope back to Bivouac Saddle, either follow the east ridge down to the saddle, or go a little right and follow a faint climbers trail down the slope. Snow conditions on the slope will again determine your route of choice. Water can be found at the base of the slope if there is a snow field present.
Equipment: If soloing the south face including downclimbing, you will not need technical gear except a helmet. Otherwise, a light rack is recommended including a set of nuts and a few small to medium cams or hexes, one 60 meter rope, a few unsewn pieces of webbing for rappel anchors, ice axe and crampons (only if ice/snow is present on the snow bridge), harness, belay/rappel device, and a helmet. There are no bolts on the south face route or fixed anchors at the rappels. A sturdy, well contructed tent is recommended for the extreme winds which can occur on FTD plateau.
Weather: The Beartooth Mountain's weather is notorious. During summer, expect any kind of weather including rain, low clouds, poor visibility, extreme winds, occasional light snow, or storms. Afternoon thunderstorms are almost a daily occurance so plan accordingly. Occasionally, a nice high pressure system moves in which provides a few days of clear weather. Otherwise, expect the worst and you will be prepared.
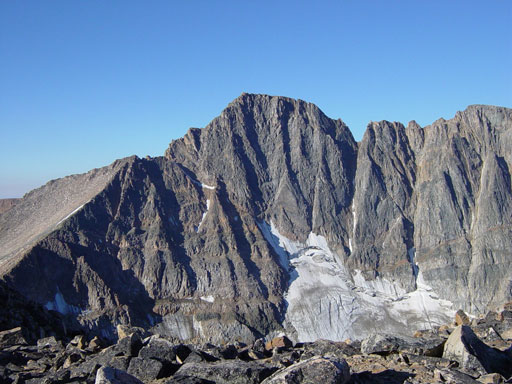
THE FOLLOWING ARE PHOTOS WITH ADDITIONAL INFORMATION ABOUT THE ROUTE. USE THESE PHOTOS IN ADDITION TO THE TEXT DESCRIPTION ABOVE. At first glance, these route photos can be a little confusing. This is because most of the route on the upper part of the mountain cannot be seen while approaching from the north via the Froze-To-Death Plateau or Avalanche Lake. The photo at the top of this page is of the north side of the mountain. The final 200 feet to the summit is on the opposite (south) side of the mountain and cannot be seen during your approach from FTD Plateau or Avalanche Lake.
Go to www.SummitPost.org to get more information on climbing Granite Peak including the approach, camping, and other stuff. In addition to more info on the standard route above, you can also find information on a non-standard route up Granite Peak called the Southwest Couloir which is rated class 3.
No part of this page may be used on a website or other media without my permission; however, you may list this page as a link either on a website or in an email. Please do not hotlink any of the photos or use any of the photos without my permission. If you send me an email (jackieandalan1@ yahoo.com), I will usually grant permission for use of the photos on non-commercial websites with proper credit and links listed. Feel free to print anything on this page for your personal use in climbing Granite Peak.
USE THIS AT YOUR OWN RISK! THERE ARE NO GUARANTEES THAT THE ROUTE DESCRIPTION OR PHOTOS ARE ACCURATE OR CORRECT.
Hiking, backpacking, rock climbing, mountaineering, skydiving, sailing, and off-roading are dangerous sports and you could be injured or killed doing them. Seek professional instruction before attempting any of these activities. The photos, trip stories, route descriptions, or any other information on this site are INACCURATE AND SHOULD NOT BE USED, or used at your own risk.